In this article we are connecting a mcModule device to Nimbus808 solution platform using MQTT.
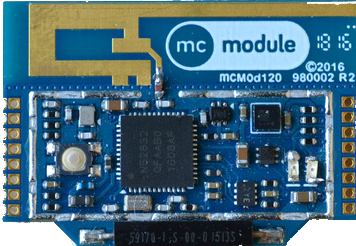
The mcModule is a compact, high-performance, and energy-efficient computing device. Powered by a single coin cell battery, it can operate for up to five years. When attached to various objects, mcModules enable remote measurement and control of multiple variables.
Important: When purchasing an mcModule, ensure you also acquire the mcGateway and mcDongle. These three components together form the mcThings platform, which can communicate with Nimbus808 either directly from the devices or via mcStudio
Requirements
- mcStudio IDE
- mcOTA updater
- mcModule 120
- mcGatway
- mcDongle
- Micro-USB Cable
- Ethernet Cable or Router
Setting up Firmware
Before beginning work with the mcModule and mcGateways, ensure all devices are updated to the latest firmware version. Firmware updates enhance functionality and maintain compatibility, ensuring optimal operation across all connected applications.
To update the firmware, use mcOTA, a desktop application designed to work with the mcDongle. It enables over-the-air mcOS updates for both mcDevices and mcGateways.
Setting up mc-Gateway
To start, configure the mcThings Gateway to enable forwarding of data received from mcModules to Nimbus808. Proper gateway setup ensures reliable communication between devices and the cloud platform.
If your mcThings Gateway is not yet configured to transmit data to Nimbus808, please consult the following article for detailed instructions:
Connect a mcGateway with Nimbus808 over MQTT
Once the gateway is properly configured, you can continue with the next steps.
Setting up the mc-Modules
All mcThings hardware is programmed using the mcStudio IDE. This integrated development environment uses mcScript, a programming language derived from Visual Basic, designed specifically for mcThings device development.
mcStudio offers tools for authoring, modifying, compiling, refactoring, deploying, and debugging your code. It also provides an interface for wireless debugging and program deployment to mcThings hardware.
To start we highly recommend you checkout the mcStudio’s introduction video:
Connecting mc Devices
- Update the mcModule with the last firmware version using the mcOTA updater
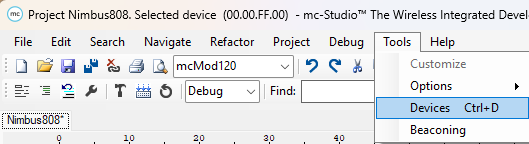
- Then, you need to assign the device(s) you are going to work with. To do this, open the mcStudio and go to Tools –>Devices.
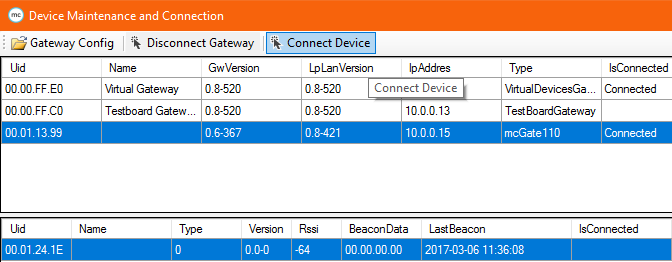
In the following window, the status of your mcThings devices is displayed. At this stage, the gateway status should show “Connected” to enable detection of the module intended for programming.
Once the mcGateway is connected you’ll be able to see the mc-Module.
- Once the mcGateway is connected, any detected mcModules will appear. To detect a specific mcModule, connect it to your computer and wait a few seconds until it is displayed in the corresponding section below.
At this stage, verify that the UID displayed in the “Device Maintenance and Connection” window matches the UID printed on your mcModule. To establish the connection, click the “Connect Device” button.
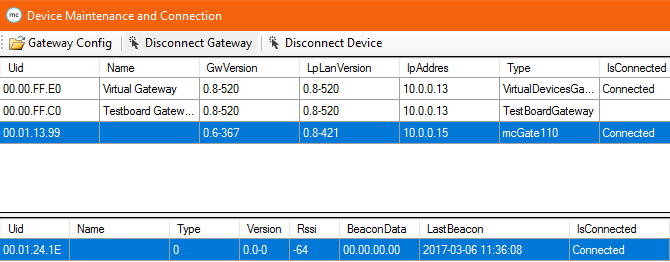
- Once your mc-Module establishes the connection properly, the status of the device will change to “Connected“. This step will take approximately 60 seconds, so please be patient.
At this point, you are ready to start programming the mcModues to transmit readings taken from the sensors to Nimbus808.
Sending Data to Nimbus808
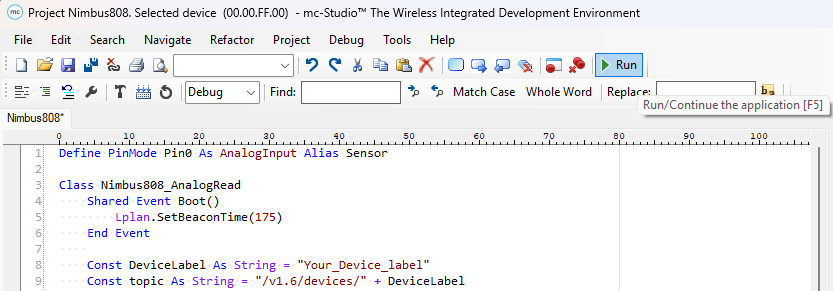
- To start sending values to Nimbus808, create a project in the mcStudio IDE. To create the project, go to File –> Create Project.
- Copy and paste the code sample below into your project. Assign the desired Device Label at the indicated location in the code. This label will serve as the identifier for Nimbus808, ensuring that any data sent to it updates the corresponding device variables accordingly.
Define PinMode Pin0 As AnalogInput Alias Sensor

Class Nimbus808_AnalogRead
    Shared Event Boot()
        Lplan.SetBeaconTime(175)
    End Event

    Const DeviceLabel As String = "Your_Device_label"
    Const topic As String = "/v1.6/devices/" + DeviceLabel

    Shared Event SensorRead() RaiseEvent Every 10 Seconds
        Dim value As Float
        value = Sensor

        Dim payload As Json = New Json
        payload.Add("sensor", value)

        Lplan.Publish(topic, payload.ToListOfByte)
    End Event

End Class- With the code now included in your project, execute it to verify that the system functions as expected. Press the Run button located in the upper-right corner of the mcStudio IDE to start the program.
At this stage, a new topic should appear in your Nimbus808 project. The topic name corresponds to the Device Label you assigned, linking all incoming data to the correct device.
Have questions? Contact us for help