In this article we are connecting a Siemens SIMATIC IoT2000 device to Nimbus808 solution platform using MQTT.
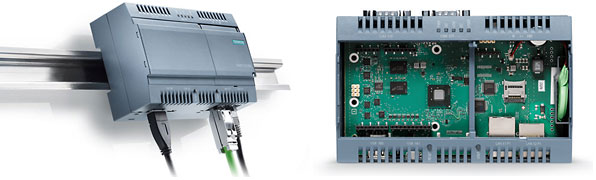
The SIMATIC IoT2000 series combines the simplicity of Arduino with the proven reliability of Siemens, making it an excellent choice for retrofitting legacy equipment or implementing IoT in smart factories and institutions. Whether adding new sensors to existing machines or upgrading outdated ones, the IoT2000 series harmonizes, analyzes, and forwards data efficiently using protocols like HTTP and MQTT. Powered by Yocto Linux, the series includes the IOT2020 and IOT2040 models, both compatible with Arduino sketches uploaded directly through the Arduino IDE. The IOT2040 is best suited for industrial applications, while the IOT2020 offers additional peripherals and communication options ideal for educational environments.
In this guide, we walk through integrating the Siemens SIMATIC IOT2000 with Nimbus808, focusing on serial communication via the RS-485 interface. An external device will connect through the SIMATIC gateway, allowing seamless data acquisition. We then configure a Node-RED flow to process this data and transmit it to Nimbus808 over MQTT, enabling real-time monitoring and analysis.
Requirements
- Siements SIMATIC IoT2000
- Arduino Uno
- Arduino Grove Shield
- RS485 Shield for Arduino
- Nimbus808 Account
First, you must register with or have access to the Siemens Support Portal to download all initial configurations. This portal also provides troubleshooting resources and direct support from Siemens for any hardware-related inquiries. The setup process is standardized across the entire SIMATIC IOT2000 series, so the same procedure applies regardless of the specific model being used. Please follow this tutorial for any device in the IOT2000 series.
Hardware Setup
Based on your environment and technical requirements, select the most suitable IOT2000 device to complete your project. When configuring the system, ensure that the device is transmitting data through the RS485 interface, as this protocol provides reliable, long-distance serial communication for industrial applications.
Our project calls for a simple Arduino UNO paired with an RS485 shield and a humidity sensor to transmit values directly to Nimbus808.
Fly-out Rule: To avoid hardware issues, always ensure the SIEMENS IOT2000 is turned OFF before making any connections.
Arduino Connections
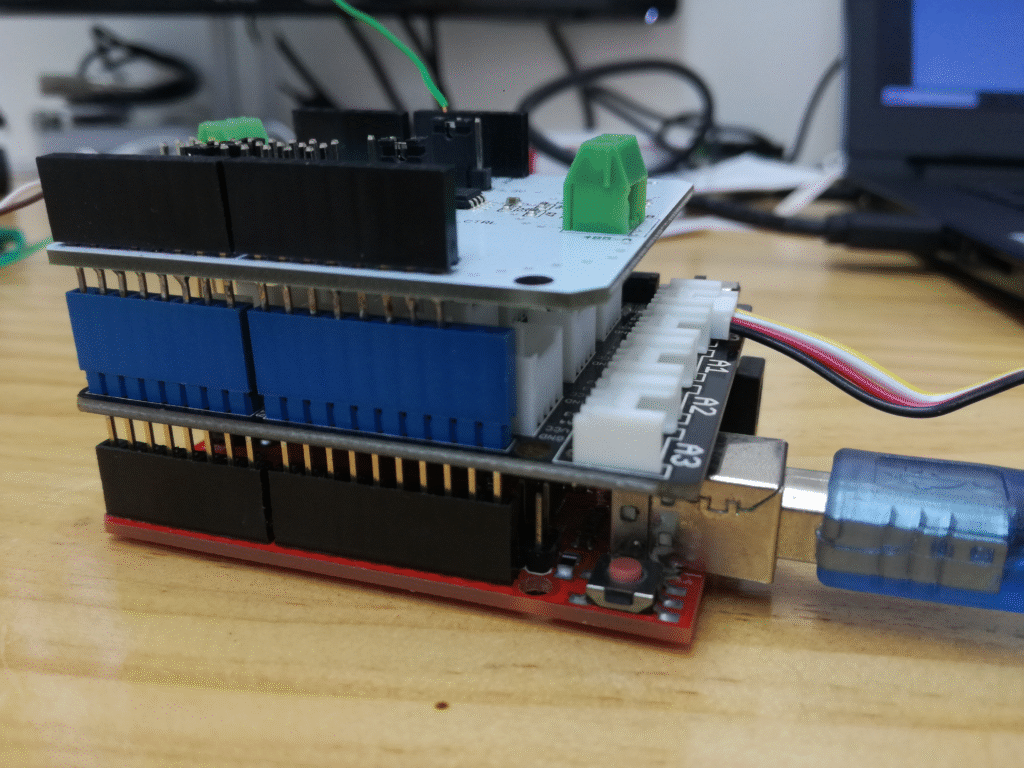
- First, attach the Arduino Grove Shield to the Arduino UNO, Then, attach the RS485 Shield on top of the Grove Shield
- Connect the Humidity Sensor to the A0 pinout of the Grove Shield using a Grove cable. Once everything is properly attached, your Arduino stack will look similar to the illustration below:
Fly-out Rule: Double-check all connections before powering ON the SIEMENS IOT2000 to prevent accidental damage.
- Verify if the headers of the RS485 shield are properly assigned with the following configuration:
- P1 -> 5V
- P2 -> TX_CTRL
- D2 -> TX
- D3 -> RX
SIMATIC IOT2000 Connections
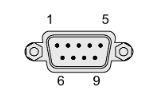
- The X30 COM and X31 COM ports allow you to work with RS232 / RS422 / RS485 interfaces.
For this project, we will use the X30 COM port configured as RS485.
Connector Pinout:
Assignment RS 485:
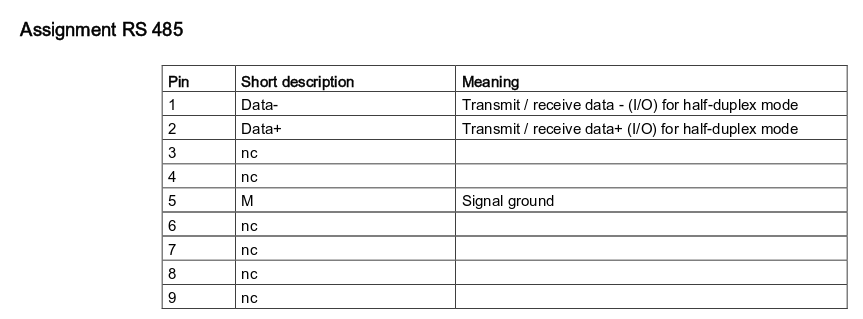
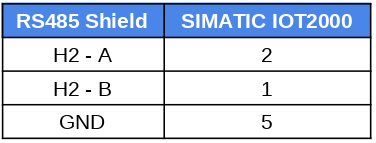
- Follow the table below to make the connection between the Arduino RS485 shield and the SIMATIC IOT2000:
Firmware Setup – Arduino IDE
- Open Arduino IDE
- Select the Arduino UNO from Tools –> Board menu
- Connect the Arduino UNO to your computer and select the port COM assigned from Tools –> Port –> Arduino UNO.
- Now with everything configured, copy and paste the sample code below into the Arduino IDE
#include <SoftwareSerial.h>

int sensor = A0;

SoftwareSerial mySerial(3,2);

void setup() {
  mySerial.begin (9600);
  Serial.begin(9600);
  pinMode(sensor, INPUT);
}

void loop() {
  int sensor_value = analogRead(sensor);
  mySerial.println (sensor_value);
  Serial.println(sensor_value);
  delay(1000);
} - Verify and upload the code choosing the “check mark” icon and then the “right-arrow” icon beside the check mark icon.
Now your Arduino UNO is sending data to the Siemens SIMATIC IOT 2000 properly.
Setting up SIMATIC IOT2000 with Node-RED
Before starting with the Node-RED flow, we must establish some configurations in the SIMATIC IOT2000.
Please, follow the steps below carefully to ensure proper functionality:
Package Manager:
- Go to opkg directory using Siemens terminal:
cd /etc/opkg- Edit the opkg.conf file by adding the lines below at the end of the file:
src iotdk-all http://iotdk.intel.com/repos/2.0/iotdk/all

src iotdk-i586 http://iotdk.intel.com/repos/2.0/iotdk/i586

src iotdk-quark http://iotdk.intel.com/repos/2.0/iotdk/quark

src iotdk-x86 http://iotdk.intel.com/repos/2.0/iotdk/x86- Next, edit the arch.conf by adding the lines below at the end of the file:
arch i586 12

arch quark 13

arch x86 14- Update the adjusted configurations with the below execution command:
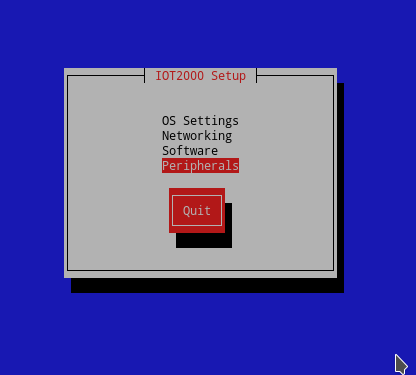
opkg update- Write iot2000setup to open the setup interface and configure the X30 COM as RS-485. To do this, select Peripherals -> Configure External COM Port -> X30 -> RS485:
- Assign the baud-rate to the port with the command below:
stty -F /dev/ttyS2 9600- Reboot the SIMATIC to save the changes with the command reboot:
Node-RED
- Write the command below in your Siemen’s terminal to enter to the Node-RED directory:
cd /usr/lib/node_modules/ - Then, install the node required by writing the following command:
npm install -g node-red-contrib-modbusThis process will take a couple of minutes so please be patient.
NOTE: If you get an issue installing the node, check out these tips and tricks to troubleshoot further.
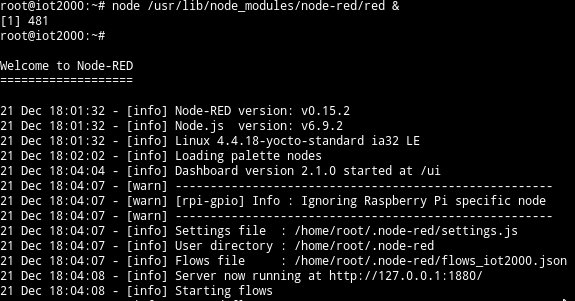
- To start Node-RED enter and execute the command below:
node /usr/lib/node_modules/node-red/red &Once the Node-RED has started properly, you should see the behavior below in your SIMATIC IOT2000. Note that is may take a couple of minutes:
- Once the Node-RED is started, open a web-browser (firefox, preferably) and write the IP Address of the SIMATIC IOT2000 and the port 1880 (i.e
http://192.168.200.1:1880) to open the Node-RED web interface. - Next, click on the Node-RED menu in the upper right corner, then “Import” –> “Clipboard” and paste the code below:
[
    {
        "id":"38e1405b.5796d",
        "type":"serial in",
        "z":"c88a5f47.16d498",
        "name":"rs-485",
        "serial":"8bf5451a.2fb14",
        "x":170.5,
        "y":223,
        "wires":[
            [
                "f7937636.d26448",
                "ae2f3a52.32f23"
            ]
        ]
    },
    {
        "id":"f7937636.d26448",
        "type":"debug",
        "z":"c88a5f47.16d498",
        "name":"",
        "active":true,
        "console":"false",
        "complete":"false",
        "x":377.5,
        "y":121,
        "wires":[]
    },
    {
        "id":"ae2f3a52.32f23",
        "type":"function",
        "z":"c88a5f47.16d498",
        "name":"parse function",
        "func":"var response = {};\nresponse.payload = {\"humidity\": msg.payload};\nresponse.topic = \"/v1.6/devices/siemens\";\nreturn response;",
        "outputs":1,
        "noerr":0,
        "x":374.5,
        "y":223,
        "wires":[
            [
                "51bcbd87.0af04c"
            ]
        ]
    },
    {
        "id":"51bcbd87.0af04c",
        "type":"mqtt out",
        "z":"c88a5f47.16d498",
        "name":"",
        "topic":"",
        "qos":"",
        "retain":"",
        "broker":"cefb900f.f02ca8",
        "x":605.5,
        "y":222,
        "wires":[]
    },
    {
        "id":"8bf5451a.2fb14",
        "type":"serial-port",
        "z":"",
        "serialport":"/dev/ttyS2",
        "serialbaud":"9600",
        "databits":"8",
        "parity":"none",
        "stopbits":"1",
        "newline":"\\n",
        "bin":"false",
        "out":"char",
        "addchar":false
    },
    {
        "id":"cefb900f.f02ca8",
        "type":"mqtt-broker",
        "z":"",
        "broker":"nimbus808.com",
        "port":"1883","clientid":"",
        "usetls":false,
        "compatmode":true,
        "keepalive":"60",
        "cleansession":true,
        "willTopic":"",
        "willQos":"0",
        "willPayload":"",
        "birthTopic":"",
        "birthQos":"0",
        "birthPayload":""
    }
]
Once your Nimbus808 broker is assigned, press Deploy and the status of the serial and mqtt node should appear as connected.
Have questions? Contact us for help